The Silicon Graphics 550 Visual Workstation contains an M29A system board. This chapter describes the M29A system board and all its major components. It contains the system board layout, jumper settings, cache and memory configurations, and information on other internal devices.
The M29A system board is a PCI bus-based, dual-processor system board built on an extended ATX baseboard. It comes with dual Slot 2 processor sockets using Pentium III Xeon processors integrated with the Intel i840 chipset. The system board also integrates the Intel 82559 10/100 Mbps PCI Ethernet chipset that supports WOL (Wake on LAN) and AOL (Alert on LAN) for better remote site management.
For expandability, the system includes one AGP Pro (Accelerated Graphics Port) slot, four 32-bit PCI-bus slots, two 64-bit PCI-bus slots, and four RIMM sockets. It also includes integrated SCSI via an Adaptec 7899 dual channel Ultra160/M controller.
For connectivity, the system board supports two USB (Universal Serial Bus) connectors, a speaker-out/line-out, audio-in, and microphone-in port, and other standard features such as two UART NS16C550 serial ports, one enhanced parallel port with Enhanced Parallel Port (EPP)/Extended Capabilities Port (ECP) support, a diskette drive interface, and two embedded hard disk interfaces.
The Pentium III Xeon processor implements a Dynamic Execution micro-architecture, a unique combination of multiple branch prediction, data flow analysis, and speculative execution. The Pentium III Xeon processor improves upon previous generations of Intel processors by adding Streaming SIMD ( Single Instruction Multiple Data) extensions. The SIMD extensions significantly accelerate performance of 3D graphics. Besides 3D graphics improvements, the extensions also include additional integer and cacheability instructions that improve other aspects of performance.
In addition, the Pentium III Xeon processor uses a variation of the S.E.C (Single Edge Contact) package technology first introduced on the Pentium II processor. The SEC packaging technology allows the Pentium III Xeon processor to implement Dual Independent Bus Architecture and has 256KB of level 2 cache. Level 2 cache is integrated in the processing unit and communication occurs at the full speed of the processor core. The Pentium III Xeon processor supports both uniprocessor and multiprocessor implementations with support for two processing units on each local processor bus, or system bus.
The four RIMM sockets on the board allow a maximum of 2GB of memory using four 512-MB RDRAM (Rambus DRAM) RIMMs. RDRAM is a new high-performance memory technology that increases overall system throughput when running workstation applications.
Intel Scalable Bandwidth Technology provides the Intel 840 chipset with the ability to meet the needs of high performance multi-processor systems utilizing the Intel Pentium III Xeon processor. In addition, the 840 chipset provides up to 3.2 GB/s of memory bandwidth and supports the new high-performance RDRAM memory technology.
The 840 chipset has three core components:
The 82840 Memory Controller Hub (MCH) differentiates the Intel 840 chipset from other Intel 800 series chipsets. The MCH provides graphics support for AGP 2X/4X, dual RDRAM memory channels, and multiple PCI segments for high performance I/O.
The 82801 I/O Controller Hub (ICH) utilizes Intel Hub Architecture to make a direct connection to the MCH. The ICH supports 32-bit PCI, IDE controllers and dual USB ports.
The 82802 Firmware Hub (FWH) stores system BIOS and video BIOS, as well as an Intel Random Number Generator (RNG). The Intel RNG provides truly random numbers to enable stronger encryption, digital signing and security protocols.
In addition to providing high performance, the Intel 840 chipset was designed for scalability. The 82806 64-bit PCI Controller Hub (P64H) supports 64-bit PCI slots at speeds of either 33 or 66 MHz. The P64H connects directly to the MCH using Intel Hub Architecture, providing a dedicated path for high performance I/O.
Intel's 82559 10/100 Mbps Fast Ethernet controller supports Advanced Configuration and Power Interface (ACPI) 1.20A based power management, wake on Magic Packet, wake on interesting packet, advanced System Management Bus (SMB) based manageability, Wired for Management (WfM) 2.0 compliance, IP checksum assist, PCI 2.2 compliance, and PC 98, PC 99, and Server 99 compliance.
The AGP Pro specifies an extension of the existing AGP bus. It delivers four times the electrical power of the current AGP specification supported by both 2X and 4X AGP modes. MCH provides an AGP interface as an independent graphics controller which makes it ideal for users of simulation, mechanical CAD, financial modeling and digital content creation applications.
The system board supports the power-management function that conforms to the power-saving standards of the U.S. Environmental Protection Agency (EPA) Energy Star program. It also offers the Plug-and-Play feature. This feature saves the user from configuration troubles, thus making the system more user-friendly.
The system board has the following major components:
Slot 2 processor socket that supports Pentium III Xeon processors and future generation Pentium CPUs
Intel i840 chipset
Onboard 10/100 Mb/s Intel 82559 LAN chip that supports WOL and AOL
Four RIMM sockets that accept 64-, 128-, 256, and 512-MB RDRAMs with a maximum memory capacity of 2GB
One AGP Pro slot, four 32-bit PCI bus slots, and two 64-bit PCI bus slots
Integrated Adaptec 7899 with dual channel Ultra160/M controller
System clock/calendar with battery backup
IDE hard disk and diskette drive interfaces
-
USB connector
Serial port 1 and 2
PS/2-compatible keyboard port
Speaker-out/Line-out port
PS/2-compatible mouse port
Audio-in port
10/100 MBps Ethernet port
Microphone-in port
Parallel port
Figure 3-1 shows the layout of the system board.
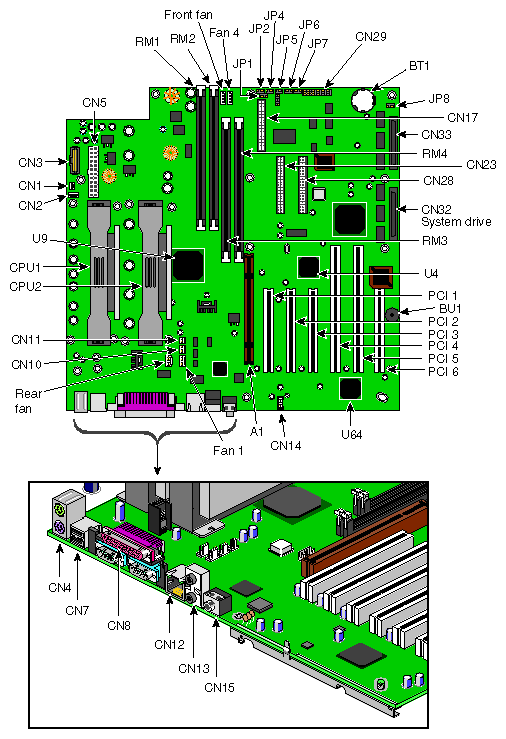
Table 3-1 describes the system board items in Figure 3-1
Item | Description |
|---|---|
A1 | AGP slot |
BT1 | Battery |
BU1 | Buzzer |
CN1 | CPU 1 thermal sensor connector |
CN2 | CPU 1 fan connector |
CN3 | Power assist |
CN4 | Upper: PS/2 mouse connector |
CN5 | Power connector |
CN7 | USB connectors |
CN8 | Upper: Parallel port |
CN10 | CPU 2 thermal sensor connector |
CN11 | CPU 2 fan connector |
CN12 | LAN jack (RJ45) |
CN13 | Upper: Line-out port |
CN14 | CD-ROM connector |
CN15 | Mic-in port |
CN17 | FDD connector |
CN22 | Reserved |
CN23 | IDE2 connector |
CN28 | IDE1 connector |
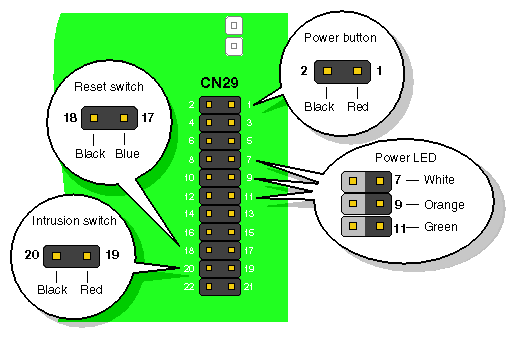
CN29 | Front connector |
CN30 | Wake on LAN connector |
CN32 | Ultra 160/m SCSI channel A connector |
CN33 | Ultra 160/m SCSI channel B connector |
CPU1-2 | Two CPU Slot-2 slots |
Fan1-4 | Housing fan connectors |
RM1-4 | RIMM slots |
JP1 | Password settings 1-2: Check password |
JP2 | BIOS settings 1-2: OEM BIOS |
JP4 | Flashed BIOS safety boot 1-2: FWH top lock |
JP5 | System reboot when POST timed out 1-2: Timeout reboot |
JP6 | Onboard buzzer/external speaker 1-2: Onboard Buzzer |
JP7 | Force CPU to run at 2 x 133 MHz or 2 x 100 MHz 1-2: Set by ICH1111 |
JP8 | SCSI terminator for Channel A 1-2: SCSI terminator off |
JP8X | SCSI terminator for Channel B |
P1,2,3, and 6 | 32-bit/33-MHz PCI slots |
P4 and 5 | 64-bit/66-MHz PCI slots |
U4 | Intel 82801 chipset (ICH) |
U9 | Intel 82840 chipset (MCH) |
U16 | Intel 82559 LAN chipset |
U37 | SMC 47B277 super I/O chipset |
U48 | AD1881 audio chipset |
U63 | Adaptec AIC-7899 chipset |
U64 | Intel 82806 chipset (P64H) |
Figure 3-2 shows the parts of the front connector (CN29).
The following sections show you how to install system components like the CPU, memory modules, and expansion cards.
Always observe the following electrostatic discharge (ESD) precautions before installing a system component:
Do not remove a component from its antistatic packaging until you are ready to install it.
Wear a wrist grounding strap before handling electronic components. Wrist grounding straps are available at most electronic component stores.
 | Note: Observe the ESD precautions when installing or removing a system component. See “ESD Precautions”. |
Each Pentium III Xeon comes in a drop-in SC330 (330-pin slot connector) SECC (Single Edge Contact Connector) package.
The system board supports dual Pentium III Xeon processors running at 733 MHz, 800 MHz, 866 MHz, and 933 MHz with on-die 256 KB L2 cache on a 133-MHz system bus
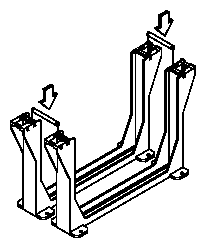
The retention mechanism needs to be installed to support and hold the processor in place. To install the retention mechanism, complete the following steps:
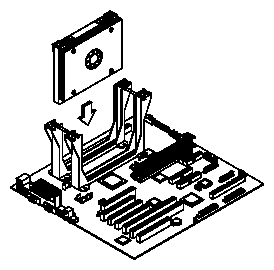
Attach both of the retention mechanisms with joint bars. Snap in the joint bars on both sides of the retention mechanisms, as shown in Figure 3-3.
Align and insert the metal plate beneath the system board along the Slot 2 retention holes, as shown in Figure 3-4.
Insert both of the retention mechanisms into the Slot 2 sockets. Make sure that the shafts of the retention mechanism with O signs are facing the external ports of the system board.
Secure the retention mechanisms with six screw nuts, three for each retention mechanism.
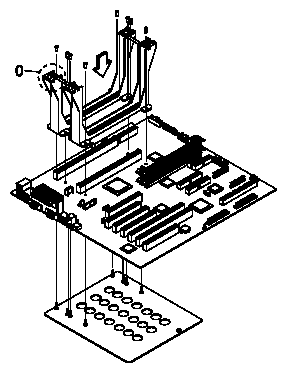
Complete the following steps to install a processor:
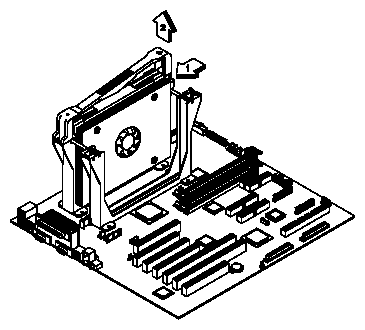
Attach the f an/heatsink module to the Pentium III Xeon processor and secure it with four screws, as shown in Figure 3-5.
Insert the Pentium III Xeon processor into an empty Slot 2 socket, as shown in Figure 3-6.
Carefully press down the Pentium III Xeon processor until it is properly inserted into the socket.
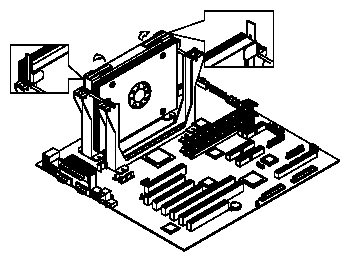
Note: If it is difficult to insert the processor card into the slot, do not force it. The orientation of the fan/heatsink may be incorrect. Use the retention mechanism cover to secure the processor by pressing it down until it locks with the retention mechanism, as shown in Figure 3-7.
The retention mechanism cover only fits one way. Both shafts of the retention mechanism and the retention mechanism cover have O and OO signs. Match the O on the cover with the O on the retention mechanism first, hook them together, insert the OO side to the retention mechanism, and make sure they are clipped.
Connect the 3-pin and 2-pin fan/heatsink cables to the system board. See Figure 3-1 for the location of the fan/heatsink connectors.

Caution: The heatsink becomes very hot when the system is on. NEVER touch the heatsink with any metal or with your hands.


Complete the following steps to remove a processor:
Disconnect the 3-pin and 2-pin fan/heatsink cables from the system board.
Unclip the retention mechanism cover, as shown in Figure 3-8.
Flip up both plastic ears of the P entium III Xeon processor, as shown in Figure 3-9. This procedure detaches the processor from the socket.
Carefully lift up and remove the Pentium III Xeon processor.
When you are not using a Slot 2 socket, you must install a terminator board into the empty slot.
Complete the following step to install the terminator board:
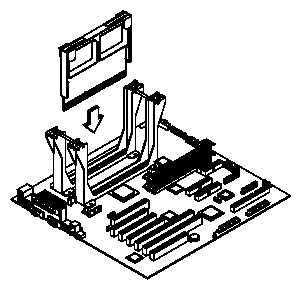
Position the terminator board over the empty slot, as shown in Figure 3-10.
Carefully insert the golden fingers of the terminator board into the slot until the board fits completely.
Use the retention mechanism cover to secure the processor by pressing it down until it locks with the retention mechanism.
The retention mechanism cover only fits one way. Both shafts of the retention mechanism and the retention mechanism cover have O and OO indicators. Match the O on the cover with the O on the retention mechanism, hook them together, insert the OO side to the retention mechanism, and make sure they are clipped.
Complete the following steps to remove the terminator board:
Unclip the retention mechanism cover.
Flip up both plastic ears of the terminator board. This procedure detaches the terminator board from the socket.
Lift up and remove the terminator board.
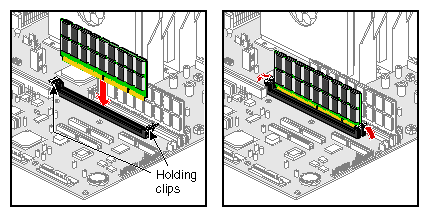
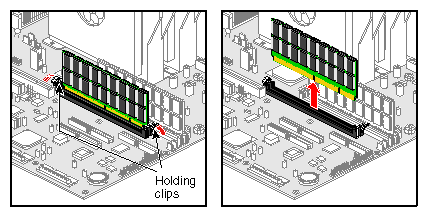
E ach of the sockets represents one independent bank. This allows you to install RIMMs with different capacities to form a configuration.
To install a RIMM, align it with the socket and press it down until the holding clips secure the RIMM in place.
Note the following important points about installing RIMMs:
The RIMM socket is slotted to ensure proper installation. If you slip in a RIMM but it does not completely fit, you may have inserted it the wrong way. Reverse the orientation of the RIMM.
RIMMs must be installed in pairs.
The RIMMs shipped with your system are PC800. When adding additional RIMM modules, be sure that they are PC800 as mixing RIMMs will cause your system to default to the slower speed.
There are three kinds of expansion slots available in this system board. These are 32-bit/33-MHz PCI, 64-bit/66-MHz PCI, and AGP Pro slots. The AGP Pro slot can be used by both high-powered (three-slot wide I/O bracket) and low-powered (two-slot wide I/O bracket) AGP cards.
Complete the following steps to install expansion cards:
Locate an empty expansion slot on the system board.
Remove the metal bracket located on the opposite side of the empty expansion slot using a Phillips screwdriver.
Insert an expansion card into the slot. Make sure that the card is properly seated.
Secure the card to the housing with a screw.
When you turn on the system, BIOS automatically detects and assigns resources to the new device.
| Note: BIOS detects and configures only PnP (Plug n Play) expansion cards. |
This section explains the different types of error messages and corresponding corrective measures.
| Note: Do not continue using the computer if you receive an error message of any type. Note the message and take corrective action. Ask a qualified technician for assistance. |
There are two general types of error messages:
Software error messages
System error messages
Software error messages are returned by your operating system or application. These messages typically occur after you boot the operating system or when you run your applications. If you receive this type of message, consult your application or operating system manual for help.
A system error message indicates a problem with the computer itself. A message of this type normally appears during the power-on self-test, before the operating system prompt appears.
Table 3-2. System Error Messages
Error Message | Possible Cause and Corrective Action |
|---|---|
CMOS battery bad | CMOS battery power lost. Action: Replace the lithium battery or contact your dealer. |
CMOS checksum error | CMOS RAM error. Action: Run Setup and reconfigure the system. (To enter the BIOS Setup screen, press CTRL + ALT + ESC during POST. For details about running Setup, see Chapter 4, “Setup Utility”.) |
CPU clock mismatch | CPU frequency has been changed by the user. Action: When the user changes the CPU frequency, this message appears once and then BIOS adjusts the CPU clock automatically. |
Diskette drive controller error or Not installed floppy disk controller Error | This error is caused by one of the following: * Power supply cable is not connected to the diskette drive connector. * The diskette drive cable is not plugged to the diskette drive interface on the system board. * The diskette drive controller is defective. Action: Check and connect the floppy cable on both floppy drive and system board ends. If the cable is good and properly connected, the diskette drive controller may be the problem. Change the diskette drive controller or disable the onboard controller by installing another add-on card with a controller. |
Diskette drive A error Diskette drive B error | Diskette drive A or B may be bad. Action: Check the floppy drive cable connections. If the diskette drive is connected properly, then replace the diskette drive. |
Diskette drive A type mismatch floppy drive A error Diskette drive B type mismatch floppy drive B error | The floppy drive does not support the type indicated in the BIOS Setup configuration. Action: Run Setup and select the proper floppy drive type. (To enter the BIOS Setup screen, press CTRL + ALT + ESC during POST.) |
ECC facility fail | RIMM might be bad. Action: Replace the RDRAM chips or the RIMMs. |
Equipment configuration error | The hardware configuration does not match the Setup configuration data. Action: Run Setup and configure the system. (To enter the BIOS Setup screen, press CTRL + ALT + ESC during POST.) |
Expansion ROM allocation failed | The I/O expansion ROM fails to allocate for the PCI device. Action: Change the I/O expansion ROM address. |
IDE drive 0 error IDE drive 1 error | The IDE drive may be bad, type mismatched, or not properly installed. Action: Replace the disk drive or the hard disk drive controller. Check the HDD cable connections and BIOS Setup configuration. |
IDE drive 0/1 auto detection failed | The hard disk drive may be bad, or not compatible with IDE industrial specification. Action: Replace the disk drive or the hard disk drive controller. Check the HDD cable connections and BIOS Setup* configuration |
IRQ setting error | Wrong IRQ setting for the PCI device. Action: Run Setup to make sure there is no IRQ device conflict. (To enter the BIOS Setup screen, press CTRL + ALT + ESC during POST.) |
Insert system diskette and press the Enter key to reboot | A non-bootable diskette is detected on the diskette drive when the system boots. Action: Insert a bootable disk in the diskette drive or remove this disk if a hard disk drive is installed |
I/O parity error | The I/O access is not correct. Action: Check all I/O related circuits (i.e. system I/O controller, memory controller, interrupt controller, DMA controller, and so on.) |
Keyboard error or no keyboard connected | POST detects an error in the keyboard or the keyboard is not connected. Action: Reconnect or replace the keyboard. |
Keyboard interface error | POST detects an error in the interface between the system board and the keyboard. The keyboard circuit module may be defective. Action: Check the keyboard interface circuit or change the keyboard. |
Keyboard locked | The keyboard lock feature prevents any access to the keyboard. Action: Unlock the keyboard. |
Pointing device error | The pointing device installed may be bad or the device is not properly connected. Action: Reconnect or replace the pointing device. |
Pointing device interface error | POST detects an error in the interface between the system board and the pointing device. Action: Check the keyboard interface circuit or run Setup and check pointing device. (To enter the BIOS Setup screen, press CTRL + ALT + ESC during POST.) |
Pointing device IRQ conflict | The same IRQ address was assigned to an add-on card and an onboard pointing device. Action: Run Setup and change the IRQ setting of the pointing device or the add-on card. (To enter the BIOS Setup screen, press CTRL + ALT + ESC during POST.) |
Press Ctrl + Alt + Esc to enter Setup or F1 key to continue | A system configuration error is detected, or the hardware configuration does not match the Setup configuration data in CMOS. Action: Run Setup. (To enter the BIOS Setup screen, press CTRL + ALT + ESC during POST.) |
Press 1 key to enter Setup or other key to continue | This message appears on the screen when a terminal instead of a console monitor is installed. Action: Press 1 to enter Setup and check the configuration. Pressing any other key prevents entering Setup. |
Press Esc to turn off NMI, or any key to reboot | A non-maskable interrupt (NMI) occurs. Action: Press Esc to reject NMI error or press any other key to reboot the system. |
Memory error at: MMMM:SSSS:OOO (W:XXXX, R:YYYY) where: M: MB, S: Segment, O: Offset, X/Y: write/read pattern | RDRAM, RIMM, or add-on memory card may be defective. Action: Replace the RDRAM chips or the RIMMs. |
NVRAM checksum error | The NVRAM in the EISA model contains EISA configuration information. Accidental data writes in the NVRAM area causes an error. POST detects the error and displays the corresponding error message. |
Onboard serial port 1 conflict(s) Onboard serial port 2 conflict(s) | Onboard serial port address conflicts with the add-on card serial port. Action: Change the onboard serial port address in Setup or change the add-on card serial port address. (To enter the BIOS Setup screen, press CTRL + ALT + ESC during POST.) |
Onboard parallel port conflict(s) | Onboard parallel port address conflicts with the add-on card parallel port. Action: Change the onboard parallel port address in Setup or change the add-on card parallel port address. (To enter the BIOS Setup screen, press CTRL + ALT + ESC during POST.) |
Onboard xxx.... conflict(s) | Onboard device resources (for example, IRQ, DMA, I/O address) conflict. Action: Try to reassign or disable onboard device resources. |
PCI device error | PCI device may be bad. Action: Check the PCI card. Replace it if it is bad. |
Real-time clock (RTC) Error | POST detects a real-time clock error. Action: Check RTC circuit or replace the RTC. |
RAM parity error | RDRAM chips, RIMMs, or add-on memory card may be defective. Action: Replace the RDRAM chips or RIMMs, or disable parity check in Setup if the model supports it. |
System management memory bad | System management memory (SMM) is bad. May be caused by system green malfunction. Action: Replace the RDRAM chips or RIMMs. |
System resource conflict | Some system resource conflicts with the resources required by the PCI devices. Action: Run Setup to reconfigure the system. (To enter the BIOS Setup screen, press CTRL + ALT + ESC during POST.) |
As a general rule, if an error message says “Press F1 to continue” it is caused by a configuration problem, which can be easily corrected. An equipment malfunction is more likely to cause a fatal error, i.e., an error that causes complete system failure.
Following are some corrective measures for error conditions:
Run Setup. You must know the correct configuration values for your system before you enter Setup, which is why you should write them down when the system is correctly configured. An incorrect configuration is a major cause of power-on error messages, especially for a new system.
Remove the system unit cover. Check that the jumpers on the system board and any expansion boards are set correctly.
If you cannot access a new disk, it may be because your disk is not properly formatted. Format the disk first using the FDISK and FORMAT commands.
Check that all connectors and boards are securely plugged in.
If you go through these corrective steps and still receive an error message, the cause may be an equipment malfunction.
If you are sure that your configuration values are correct and your battery is in good condition, the problem may be a damaged or defective chip.
In either case, contact an authorized service center for assistance.
The BIOS Utility allows you to view your system's configuration settings. Most systems are already configured by the manufacturer or the dealer. There is no need to run Setup when starting the computer unless you receive a Run Setup message.
The Setup program loads configuration values into the battery-backed nonvolatile memory called CMOS RAM. This memory area is not part of the system RAM.
| Note: If you repeatedly receive Run Setup messages, the battery may be bad. In this case, the system cannot retain configuration values in CMOS. Ask a qualified technician for assistance. |